![]()
SharePoint libraries are a great way to manage template-driven documents. However there are some wrinkles if you’d like to manage macro-enabled documents. This article will provide an overview of those issues and a solution that you may find useful.
The Basics
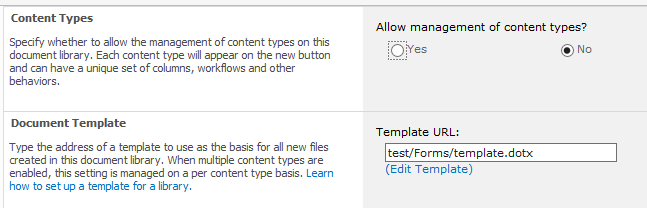
In SharePoint, a library can hold, with a few restrictions, any type of document. By default the “New Document” button on a library will allow you to upload a file or create a new blank document based on default templates (you can set the default type type – Word, Excel, etc. – when creating the library). You can change this to a custom template in the Document Library Settings, “Advanced Settings” page (below).
Any standard Microsoft Office document can be used as a template. As of Office 2007, this will most likely be “template” extension (*.dotx for Word, *.xltx for Excel and *.potx for Powerpoint) or a normal document (*.docx, *.xlsx or *.pptx). You can also use macro-enabled Word and Excel documents (*.docm or *.xlsm).
In any case, once you configure a custom template (or, if Allow management of content types? is set to “Yes”, multiple custom templates), pressing the “New Document” button will automatically open a copy of that template for use. You can then return to the “Advanced Settings” page at any time to edit or replace the document template.
Macro Enabled Documents
For security and visibility reasons, any Word or Excel document that contains macros will be saved in the *.docm or *.xlsm formats. While these can be used as document library templates, there are issues.
Most of the issues are relatively minor and stem from the fact that these macro extensions are prone to security warnings and are often flagged by email and malware protection systems. Forgiving those, there is one absolutely no-go issue for me: collaboration features are completely unavailable in these documents. You’ll be unable to collaboratively review, edit or manage documents using these extensions.
On the desktop, you could solve such issues by storing macros in the global template (normal.dotm, by default) and this will work in SharePoint as well. Sort of. When a document is opened from SharePoint it will attempt to use the global template of the local machine. This means that any macros would need to be added to the local templates of every single user of the library; something that normally isn’t a workable solution.
What’s needed is a solution that eliminates the problems of using the macro templates, but still allows for central management without custom local client configuration.
An Example and a Solution
Recently, I had the requirement to create a library of log documents in Word format (*.docx). The documents contain chronological notations and other information about recurring problems. I created the document template and then configured it as the default template for a new SharePoint library. This worked well, as far as it went.
I later decided to provide a simple method for authors to add a standardized date/time stamp via a keyboard shortcut. The following simple macro fit the bill nicely:
Sub TimeStamp_DateTime()
     Selection.InsertDateTime _
     DateTimeFormat:="DD/MM/YYYY HH:mm", _
     InsertAsField:=False, _
     InsertAsFullWidth:=False, _
     DateLanguage:=wdEnglishUS, _
     CalendarType:=wdCalendarWestern
End Sub
After much experimentation and pain, this is the process I used to make that macro available. All of the following were done in Word 2010 and SharePoint 2010 Standard:
I created a new macro-enabled document, Global_CustomMacros.docm (the name doesn’t matter), to host the macro. I uploaded this document to the root of the SharePoint Style Library. (For more about why I use the Style Library, see my article, “SharePoint Scripting Basics: Master Pages, Caching and Loading Scripts“.)
Next, I configured the shortcut. Warning: this process is significantly more complex than seems to be necessary:
- Open your *.docm for editing.
- Choose “FILE” on the ribbon menu, then “Options” and finally click “Customize Ribbon” from the left-hand menu.
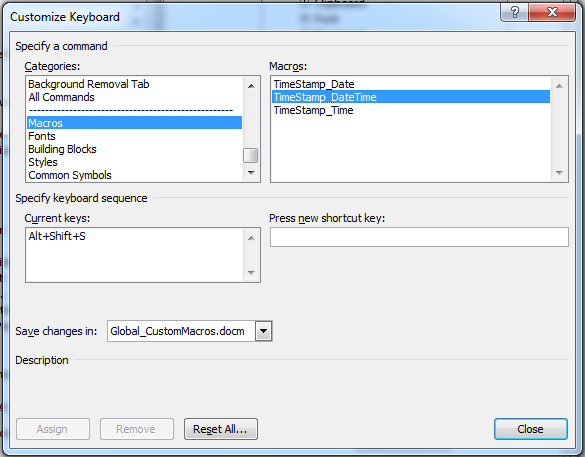
- Within the dialog, at the bottom of the left column, find Keyboard shortcuts and press “Customize…” to open the Customize Keyboard dialog (pictured).
![SharePoint, Document Libraries, Customize Keyboard]()
- In the Categories area, scroll to near the bottom and select “Macros”.
- Near the bottom of the dialog, change Save changes in to the name of the current file.
- Select the name of your macro from the list.
- Mouse click into the Press new shortcut key field to give the field focus.
- Press the shortcut key sequence that you’d like to use. I used Alt+Shift+S, which happily doesn’t conflict with any existing shortcuts (the dialog will tell you if your selection is currently assigned).
- Press “Assign”, then “Close”, then “OK” to save the shortcut.
- Save the template.
Authors can now use the keyboard shortcut to add a timestamp to the current cursor location.
Finally, we need to link the list’s document template to the macro template. You could have also done this prior to uploading the template to the list. To do this in Word 2010:
- Go to the document library settings and click “Advanced Settings”.
- Click the link to “Edit Template” in the Document Template area and the template will open in Word.
![SharePoint, Document Libraries, Templates and Add-ins]()
- Choose “FILE” on the ribbon menu, then “Options” and finally click “Add-ins” from the left-hand menu.
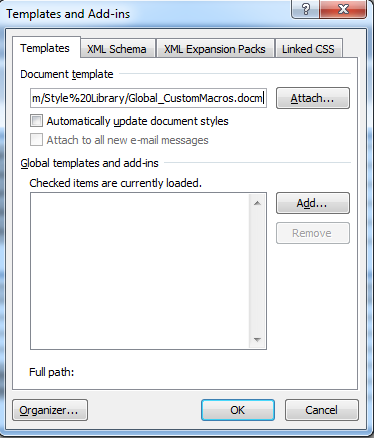
- At the bottom of the resulting dialog, choose “Templates” from the Manage drop-down, then press “Go…” The Templates and Add-ins dialog (pictured right) will open.
- In the Document template enter the full Internet path to the macro template and press “Attach…”. Your path may appear similar to this: https://www.myCompany.com/
mySite/Style%20Library/
Global_CustomMacros.docm - Press “OK” to complete the action.
This will, finally, make the macro available for use when a new document is created from the template in that library. The documents fully support all collaboration features and can be trusted by the users to eliminate annoying security messages.
One caveat: the macros will only be available when the documents using them are able to find the macro template. In other words, when they’re opened on a system that has access to the SharePoint site on which they’re created/hosted. If transferred to a system or person that lacks access, the macros will not be available.
In Conclusion
To recap, creating a library of macro-enabled, template-driven documents entails:
- Create a *.docm file to hold your macros.
- Upload this file to your site in a location accessible to all users of the library (I recommend the Style Library).
- Optionally, add keyboard shortcut customizations to the *.docm file to make accessing your macros easy.
- Create your document template and save it as a *.docx file.
- Link your macro file (*.docm) to your document template (*.docx) via the Templates and Add-ins dialog.
- Create a new document library and upload your template as the default template for the library.
While this example is simple, the sky is the limit when it comes to macros. Anything from simple task automation to complex business processing is possible. You can even create macros that interact directly with SharePoint, something I discuss in another article, “Accessing SharePoint Lists with Visual Basic for Applications“.
I hope you’ve found this useful and will consider sharing any new information you may find!